
Grips wear out faster than you’d think — and worn grips cost you control exactly when you need it. Here’s how to spot a grip past its prime, and how to swap in a new set, slide-on or lock-on, without a fight.
Recognizing When to Replace Your Bike Grips
Grip lifespan depends on how much you ride, where, and what the grips are made of. Watch for these signs:
| Sign | What it tells you |
|---|---|
| Thinning surface | You can feel the bar under your palms — the grip has worn through its cushioning |
| Lost traction | The texture has worn smooth and hands slip, especially in the wet |
| Hardened rubber | Sun and weather have cured the compound — shock absorption is gone |
| Twisting on the bar | The grip’s inner integrity is failing; readjusting rarely fixes it for long — and it’s dangerous |
| Numb, tired hands | If bike fit and position haven’t changed, worn grips are a likely culprit |

Tools You’ll Need
- New grips — not sure which diameter or length? See our bike grip sizes guide
- Flat-head screwdriver or thin tool (for slide-on grips)
- Rubbing alcohol or compressed air
- Allen wrench (for lock-on grips)

How to Remove and Install Slide-On Bike Grips
Slide-on grips like the Funn Hilt ES are the budget-friendly option: no clamps, minimal weight, just rubber on bar. They take a little more patience to fit than lock-ons — that’s the trade.
Removing
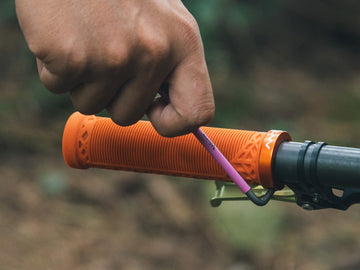
- Lift the grip edge: slip a thin tool or flat-head screwdriver between grip and bar — gently, so you damage neither.
- Add rubbing alcohol: drip or spray it into the gap. It lubricates instantly and evaporates without residue.
- Pull the grip off: twist and pull; if it fights back, repeat the alcohol and try again.
- Clean the bar: wipe off any residue so the new grip seats properly.

Compressed air works too: inject it between grip and bar and the grip floats free on a cushion of air — no tools, no damage.

Installing
- Clean the bar with rubbing alcohol and a cloth — dirt or old adhesive will spoil the fit.
- Wipe alcohol over the grip area: it’s a temporary lubricant that evaporates to leave a secure fit.
- Slide the grip on fast, twisting slightly to keep it straight, until it sits flush with the bar end — the alcohol dries quickly, so don’t hesitate.
- Let it set for several hours, ideally overnight.
- Test before riding: the grip should not twist or slide. If it moves, redo the job with a cleaner bar and quicker hands.

How to Remove and Install Lock-On Bike Grips
Funn’s Combat Series, Holeshot and top-selling Hilt are all lock-on grips: an alloy collar clamps them to the bar, so they come on and off in minutes with nothing but an Allen key.
Removing
- Loosen the collar bolt(s) with the right size Allen wrench — no need to remove them fully. Do both ends if your grips clamp at both.
- Slide the grip off. If it sticks, loosen the bolts a touch more and twist gently.
- Clean the bar before the new grips go on.

Installing
- Clean the bar with rubbing alcohol so the collar clamps on a true surface.
- Slide the grip on — the rigid inner sleeve glides over the bar without lubricant.
- Set the position: rotate any contours to match your hands and push the grip flush against levers and shifters.
- Tighten the collar bolt(s) to the manufacturer’s torque spec — snug, not crushed.
- Test for firmness: a good twist and tug. Any movement means reposition and retighten.


Hilt Lock-On Grips
Funn’s best-selling grip: single lock-on collar, outer bump-stop, just 96 g — in 11 colours.
VIEW HILT
Holeshot Lock-On Grips
Developed with Funn’s elite racers: plush vibration-absorbing compound, triple-fin underside and hardened ends.
VIEW HOLESHOTGrips off is also the first step of a bar swap. Full walkthrough here: Mountain Bike Handlebar Replacement 101: A Step-by-Step Guide
Conclusion
Fresh grips are one of the cheapest upgrades in mountain biking, and one of the most noticeable — better control, better comfort, less fatigue. Whether you want the quick-change convenience of lock-ons like the Combat Series, Holeshot and Hilt, or the minimalist economy of the slide-on Hilt ES, Funn’s grip range has a fit for every rider.

Your contact point, your colour
Lock-on and slide-on grips in 11 colours — race-proven components since 1997.
VIEW ALL GRIPS