A dropper post is only as good as its lever. Here’s how to set up the Funn UpDown dropper lever — mounting position, angle and cable routing — so it lands exactly where your thumb wants it.
What the UpDown Lever Is
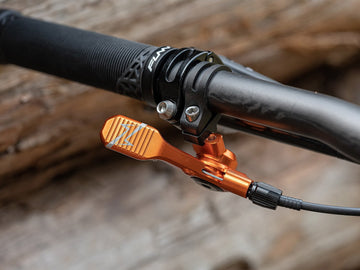
The UpDown is an aftermarket upgrade for cable-actuated dropper posts, CNC’d from lightweight alloy and available in eight colours. It mounts on either side of the handlebar, above or below the bar, and works with almost any cable-actuated dropper — whether the cable tension is set from the lever end or the post end.
Tools Needed
- 2mm, 3mm and 4mm hex keys
Setting It Up, Step by Step
Step 1: Assemble your configuration
Start with the product manual — it’s on the UpDown product page and shows every mounting configuration with a step-by-step assembly guide. Build the lever in the layout that suits your cockpit: left or right, top or bottom of the bar.
Step 2: Mount it on the bar
Remove your grip, slide the lever onto the bar, and tighten the clamp just enough to hold position.
Step 3: Set the angle
Use the 3mm angle-setting bolt to rotate the lever to exactly where your thumb falls naturally — undo, rotate, re-tighten.
Step 4: Route the cable
Check your dropper post manufacturer’s instructions to see whether cable tension is set at the post or at the lever — the UpDown supports both. Fit the cable accordingly.
Step 5: Fine-tune and ride
Reinstall your grip, make any final position tweaks, and go test it on the trail.
If anything feels unclear mid-install, your local bike shop can sort it in minutes — and the full manual is always on the product page.

UpDown Dropper Lever
Fully CNC’d, mounts four ways, works with most cable droppers — in eight colours to match your build.
VIEW UPDOWN LEVERDial in the rest of your cockpit
Levers, grips, bars and stems — race-proven components engineered in Taiwan since 1997.
VIEW ALL COMPONENTS