
Handlebars feel off? Replacing a threadless bike stem is a straightforward job with the right tools. Here’s when to do it — and how, step by step.
5 Signs It’s Time to Replace Your Bike Stem
1. Wear and tear
Stress cracks, chipped paint or visible fatigue mean replace it — a compromised stem is a safety risk.
2. A change in riding style
Moving from casual rides to racing or aggressive trail? Your stem should match.
3. Discomfort
Persistent hand, arm or shoulder pain often points to the wrong length or angle.
4. Structural damage
Bent or cracked after a crash: replace it immediately, no exceptions.
5. Aesthetics
Sometimes you just want the cockpit to match. That counts too.

Threaded vs Threadless Stems
Threaded stems live on older bikes and adjust with a single bolt. Threadless is the modern standard — lighter, stiffer and easier to adjust. This guide covers threadless stems only.

Tools Needed
- Allen wrench set
- Torque wrench
- New stem

How to Remove the Old Stem
Step 1: Loosen the stem cap
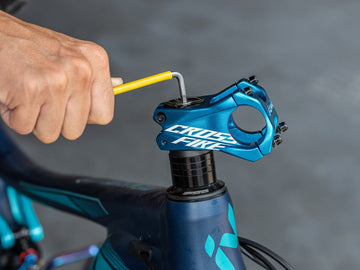
Gently loosen the stem cap with an Allen wrench, remove it and set it aside.

Step 2: Loosen the clamp bolts
Loosen the bolts on both the handlebar clamp and the steerer clamp — just enough to free the stem, no need to remove them fully.

Step 3: Remove the old stem
Lift the stem off the steerer tube. If it’s stuck, wiggle it gently side to side while pulling up.

Step 4: Inspect and clean the steerer
Check the steerer tube for wear or damage, and wipe off old grease and grime before fitting the new stem.
How to Install the New Stem
Step 1: Fit the stem and check steerer height
Slide the new stem on. The top of the steerer should sit 2–3mm below the top of the stem — adjust with spacers (below or above the stem) to keep that gap.

Step 2: Preload the headset
Tighten the stem cap just enough to remove vertical play. Turn the wheel side to side — it should rotate freely with no grinding. Too tight? Back it off and try again.

Step 3: Identify your clamp type
Funn stems use two faceplate designs: even-gap (like the Funnduro and Stryge) needs equal gaps top and bottom; no-gap (like the Equalizer, Tron and Crossfire) closes fully at the top, marked “No-gap” on the faceplate. Check the manual if unsure.

Step 4: Tighten the handlebar clamp
Center the bar and set your preferred roll angle first. Even-gap: tighten bolts a little at a time, alternating sides, keeping the gaps equal. No-gap: tighten the top bolts to spec first (5Nm on Funn stems), then the lower bolts, alternating sides. Always follow the torque printed on the stem.


Step 5: Align and tighten the steerer clamp
With the steerer bolts snug but not tight, stand over the bike and square the bar to the front wheel. Once aligned, tighten the steerer clamp bolts alternately to spec.

Step 6: Double-check and test ride
Give the bars a firm shake and a tug — everything should feel rock solid. Take a short test ride to confirm.

Common Mistakes to Avoid
Improper headset preload
Too loose means play in the steering; too tight ruins the bearings. Aim for smooth rotation with zero play.
Wrong handlebar bore size
31.8mm and 35mm bars are not interchangeable — check both specs before buying. (Read more: MTB Handlebar Widths: Finding the Perfect Fit)
Wrong clamping method
Even-gap and no-gap faceplates tighten in different sequences — using the wrong one can damage the bar or stem.

Misaligned handlebars
Take your time squaring the bar — misalignment ruins handling and strains your wrists.
Over-tightening bolts
Follow the manufacturer’s torque specs. Stripped threads end rides early.

Funnduro Stem
The all-rounder of the Funn stem range — 35, 45 and 60mm lengths for trail and enduro.
VIEW FUNNDUROConclusion
A correctly fitted stem means safer, sharper handling — and it’s one of the easiest jobs you can do at home. Work through the steps, respect the torque specs, and if anything feels beyond you, your local shop has your back.

Time for a fresh stem?
Even-gap or no-gap, short or long — race-proven components since 1997.
VIEW ALL STEMS