
Riding a bike is one of those simple pleasures in life. It can be a means of transportation, a fitness routine, or a weekend adventure. Regardless of why you ride, one component that consistently connects you to your bicycle is the grip. Over time, as with any part of your bike, these grips wear out and require attention. Knowing when and how to remove bike grips is crucial for a smooth and comfortable ride.
In this blog post, we’ll delve deep into the signs that indicate it’s time for new grips. Moreover, we’ll guide you step-by-step through the removal of your old grips and the installation of the new ones.
Recognizing When to Replace Your Bike Grips
The lifespan of a bike grip varies depending on usage, conditions, and the quality of the grip itself. However, it’s essential to recognize the signs indicating that it’s time for a replacement:
Wear and Tear:
Over time, all grips thin out, especially where your palms apply the most pressure. If you start to feel the handlebar underneath more than usual, it’s time for a new set.
Loss of Traction:
Grips are designed to provide traction for your hands. As they age, the surface patterns or textures can wear down, causing your hands to slip, especially when wet.
Hardening of Rubber:
Over time, especially with exposure to elements, the rubber or material of the grips can harden, reducing their shock-absorbing properties. Hard grips can lead to discomfort during rides.
Rotation on the Handlebar:
Grips that twist or move around on the handlebar can be dangerous. While sometimes this might be fixed by readjusting or adding adhesive, often it indicates a loss of the grip’s inner integrity.
Comfort and Fatigue:
If you find your hands getting fatigued, numb, or uncomfortable during rides, and it’s not related to other factors like bike fit or riding position, it might be due to worn-out grips.

Tools You’ll Need
New grips
Flat-head screwdriver or thin tool (for slide-on grips)
Rubbing alcohol or compressed air
Allen wrench (for lock-on grips)

How to Remove and Install Slide-on Bike Grips?
Funn Hilt ES grips are slide-on models, offering a more budget-friendly alternative to lock-on grips. While slide-on grips may require a bit more patience and finesse during the installation process, they remain an economical choice for riders who are willing to spend a little extra time on setup. Their affordability and minimalistic design appeal to those who don’t necessarily need the quick-change convenience of lock-on grips but still want a reliable and functional handlebar grip.
Removing
-
Insert a Flat-Head Screwdriver Under the Grip Edge:
Carefully insert a thin tool or flat-head screwdriver between the grip and the handlebar, taking care not to damage the grip material or the handlebar itself. The goal here is to create a small gap to allow a lubricant to penetrate and make grip removal easier. -
Apply Rubbing Alcohol as a Lubricant:
Using a small spray bottle or a dropper, apply rubbing alcohol along the edge of the grip where you inserted the tool. Rubbing alcohol acts as an excellent lubricant that evaporates quickly, making it easier to slide the grip off without leaving any residue. -
Pull Off the Grip:
After you’ve sufficiently loosened the grip, grasp it firmly and pull it away from the handlebar. It should slide off relatively easily if properly lubricated. If it’s still sticking, apply a bit more rubbing alcohol and repeat the previous step. -
Clean Any Residue from the Handlebar:
Before installing new grips, it’s crucial to clean off any remaining residue on the handlebar. Wipe it down with a clean cloth to ensure a good fit for your new grips.

Installation
-
Ensure the Handlebar is Clean:
Start by cleaning the handlebar thoroughly to remove any dirt, grease, or old adhesive that could interfere with the new grip installation. Use a cloth and some rubbing alcohol for a thorough clean. -
Apply a Small Amount of Rubbing Alcohol:
Dampen a cloth with rubbing alcohol and wipe it over the area where the grip will go. The rubbing alcohol acts as a temporary lubricant that makes it easier to slide the grip onto the handlebar but evaporates quickly to leave a secure fit. -
Quickly Slide the Grip Onto the Handlebar:
As soon as you’ve applied the rubbing alcohol, quickly slide the new grip onto the handlebar. The alcohol will start to evaporate rapidly, so you’ll want to act fast. You may need to twist the grip slightly as you push it onto the handlebar to ensure it goes on straight and sits flush against the end of the handlebar. -
Allow Several Hours (or Overnight) for the Grip to Dry and Secure:
After the grip is in position, let it sit for several hours or ideally overnight. This gives the rubbing alcohol time to evaporate, leaving the grip securely in place. -
Test the Grip for Stability:
Before heading out for a ride, make sure to test the grip by trying to twist or slide it. It should feel solid and immovable. If it still feels loose, you may need to remove it and repeat the installation process, ensuring that the handlebar is completely clean and that you act quickly after applying the rubbing alcohol.

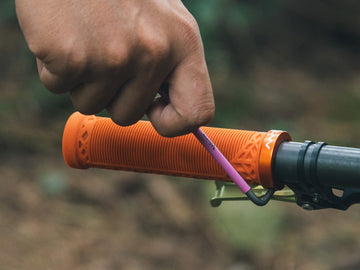
Special Trick
When you’re trying to take off slide-on grips, using compressed air can be really helpful. Inject compressed air between the grip and the handlebar, creating a small gap that makes it easier to slide off the grip. It’s a safe way to loosen the grip without causing any harm.

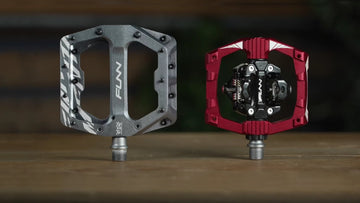
How to Remove and Install Lock-On Bike Grips?
Funn Combat Series, Holeshot, and our top-selling Hilt grips all belong to the lock-on category, making them exceptionally user-friendly for those who enjoy tackling bike maintenance at home. Lock-on grips are designed for ease of installation and secure handling, ensuring that even DIY enthusiasts can quickly and effectively replace them without specialized tools or expertise.
Removing
-
Loosen the Grip’s Bolt(s) with an Allen Wrench:
Locate the bolt or bolts that hold the lock-on grip in place. These are usually found at the ends of the grips. Use the correct size Allen wrench to gently loosen them. You don’t need to fully remove the bolts; just loosen them enough to disengage the lock mechanism. Make sure to do this on both sides if your lock-on grips have bolts at both ends. -
Slide the Grip Off the Handlebar:
Once the bolts are loosened, grasp the grip and slide it off the handlebar. If the grip seems stuck, ensure that the bolts are sufficiently loosened. You may also gently twist the grip back and forth to free it up, but generally, lock-on grips come off quite easily once the bolts are loosened. -
Clean the Handlebar:
Before installing your new grips, remove any dirt, residue, or old adhesive from the handlebar. Use a clean cloth to wipe down the area where the grip will go. This ensures a clean surface for the new grips, making for a more secure fit.

Installation
Clean the Handlebar:
Before installing your new lock-on grips, make sure the handlebars are clean of dirt, grease, or any old adhesive. Use rubbing alcohol and a clean cloth for effective cleaning. A clean surface ensures a firm grip and proper installation.
Slide the New Grip onto the Handlebar:
Once the handlebar is clean, take your new lock-on grip and slide it onto the handlebar. You should be able to easily slide it into position since lock-on grips typically have an inner sleeve that fits smoothly over the handlebar.
Adjust to the Preferred Position:
After sliding the grip on, adjust it to your desired position. This could mean aligning it so that any contours fit your hand’s natural grip, or simply ensuring that it’s pushed up flush against other handlebar components like brake levers or shifters.
Tighten the Grip’s Bolt(s) Using the Allen Wrench:
Once the grip is in your preferred position, use an Allen wrench to tighten the bolt or bolts on the grip’s collar. Make sure to tighten to the manufacturer’s recommended torque specifications to ensure a secure fit without damaging the grip or handlebar.
Test for Firmness:
After everything is tightened, give the grips a good twist or tug to make sure they’re securely attached. The grip should not rotate or slide when force is applied. If it does, you may need to loosen the bolts, reposition the grip, and then retighten.

Conclusion
Regular maintenance of your bike grips is not just a matter of aesthetics or personal preference; it’s an essential practice that can substantially improve your mountain biking experience. Grips that are well-maintained provide not only better control but also greater comfort, especially on challenging terrains that require precise handling.
If you’re considering new grips, be sure to explore Funn’s wide range of grip options. Whether you prefer the quick-change convenience of lock-on grips like the Combat Series, Holeshot and Hilt, or the economical and minimalistic design of slide-on grips like the Hilt ES, Funn has something to suit every rider’s needs.
Wishing you happy trails and safe journeys on all your biking adventures!