
Welcome to your go-to guide for steering your bike towards stability and control. Are your handlebars giving you grief? Do you feel like you’re steering a pirate ship in choppy waters rather than smoothly cruising down the bike lane? Perhaps it’s time to consider replacing your bike stem. The stem serves as the vital link between your handlebars and your bike’s steerer tube, affecting not only your steering but also your overall riding comfort and efficiency. A well-chosen and properly installed stem can elevate your biking experience from merely tolerable to truly enjoyable. In our next section, we’re going to cover the unmistakable signs that your stem is crying out for an upgrade. You won’t want to overlook these clues.
5 Signs It's Time to Replace Your Bike Stem
Understanding the appropriate timing to replace a bike stem is an important aspect of bicycle maintenance and safety. There are several key indicators that can alert you to the need for this component to be replaced:
1. Wear and Tear
Prolonged use of a bicycle stem, especially under strenuous conditions such as off-road biking, can result in material fatigue. Observable signs include stress fractures, chipping paint, or any other visible degradation. A compromised stem not only affects the integrity of the bike but also poses safety risks.
2. Change in Riding Style
Transitioning from casual cycling to more aggressive forms such as mountain biking or road racing necessitates equipment that matches your performance needs. A stem designed for high-intensity cycling may differ significantly in both form and function compared to one used for leisurely rides.
3. Discomfort and Ergonomics
If you experience persistent discomfort in the hands, arms, or shoulders during or after rides, it could indicate a suboptimal fit in terms of stem length or angle. Addressing this issue is not just a matter of comfort but also of long-term musculoskeletal health.
4. Structural Damage
Any form of structural compromise due to accidents or impacts, such as bending or cracking, necessitates immediate replacement of the stem. Operating a bicycle with a damaged stem is hazardous and increases the risk of equipment failure.
5. Aesthetic Reasons
While not a mechanical or safety concern, some individuals may choose to replace their bike stem for purely aesthetic reasons, such as to update the look of their bike or to better match a new color scheme.

Threaded vs Threadless Stems
In the world of bike stems, there are primarily two types: threaded and threadless. Threaded stems are mostly found in older models and are adjusted using a single bolt. Threadless stems, on the other hand, are the standard for modern bikes. They are typically lighter, offer better stiffness, and allow for more effortless adjustments.
Note: This Blog Focuses on Threadless Stems
Given that most modern bikes come with threadless stems, this guide will focus exclusively on how to replace this type of bike stem. If you have an older bike with a threaded stem, the steps outlined here won’t apply to your bike, and you might want to consider looking for a guide tailored to threaded stems.

Tools Needed
- Allen wrench set
- Torque wrench
- New stem

How to Remove the Old Stem?
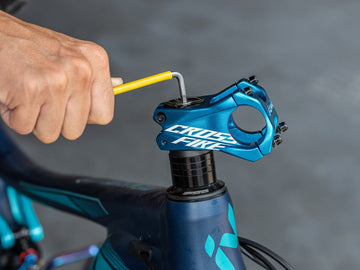
Step 1: Loosen the Stem Cap
Use an Allen wrench to gently loosen the stem cap, remove it, and set it aside for later use.

Step 2: Loosen the Handlebar and Steerer Tube Clamp Bolts
Using an Allen wrench, gently loosen the clamp bolts on both the handlebar and the steerer tube. You don’t need to remove the steerer clamp bolts entirely—just enough to allow easy removal of the old stem.

Step 3: Remove the Old Stem
Carefully lift the old stem off the steerer tube. If it’s stuck, gently wiggle it side to side while pulling upwards.

Step 4: Inspect and Clean the Steerer Tube
After removing the old stem, inspect the steerer tube for any signs of wear or damage. Remove any old grease or residue to ensure a clean fit for the new stem.
How to Install the New Stem?
Step 1: Place the New Stem and Check the Steerer Tube Length
Slide the new stem onto the steerer tube. The top of the steerer tube should be 2-3mm lower than the top of the stem.

Adjust the number of spacers as needed to achieve this gap. If you prefer a lower riding position, you can also place the spacer on top of the stem. Remember, the 2-3mm gap between the top of the steerer tube and the top of the stem should be maintained, even with the spacer on top.
Step 2: Preload the Headset
Begin by tightening the stem cap, but don’t go all out. Your goal is to preload the headset bearings, which means applying just enough force to eliminate any vertical free play in the headset assembly.
After reaching this point, give the front wheel a gentle turn from side to side. The headset should turn freely without any grinding or resistance. If it doesn’t, you might have tightened the stem cap too much. In that case, loosen it slightly and test again until you achieve that Goldilocks level of “just right.”

Step 3: Identify the Handlebar Clamp Type
Before tightening the handlebar clamp, it’s crucial to identify the type of clamp your stem uses. There are two primary types:
- Even Gaps: Stems like Funn’s Funnduro and Stryge require even gaps at both the top and the bottom between the faceplate and the stem body.
- No Gap at Top: Stems such as the Equalizer, Tron, and Crossfire leave no gap at the top and typically have a “No-gap” mark on the top section of the faceplate or the stem body.
You can also confirm your stem’s clamp type by referring to the manufacturer’s manual.

Step 4: Tighten the Handlebar Clamp Bolts
First, make sure the handlebar is centered in the clamp and adjust it to your preferred pitch angle. A misaligned handlebar can affect both your control and your comfort during the ride.
For Even-Gap Stems:
Start by slightly tightening each bolt.
Alternate from one side to the other if your stem has more than one bolt on each side.
Ensure that the gaps between the faceplate and the body are even. This maintains even pressure and avoids warping or misalignment.

For No-Gap Stems:
Tighten the top bolts to the specified torque first. For Funn stems, for example, the recommended torque is 5Nm.
Then tighten the lower bolts, alternating from one side to the other for even clamping.
Safety Note: Don’t go full Hercules on these bolts. Always follow the torque specifications provided by the manufacturer. Over-tightening can damage both the handlebar and the stem, and that’s the last thing you want to discover mid-ride.

Step 5: Align the Handlebar and Tighten the Steerer Clamp Bolts
With the steerer clamp bolts slightly snug but not fully tightened, stand over the bike and look down at the alignment between the handlebars and the front wheel. To adjust alignment, gently grip the handlebars and turn them until they’re perfectly vertical to the front wheel. Fine-tuning may be required, so don’t rush this step.

Once you’re satisfied with the alignment, tighten the steerer clamp bolts from one to the other. This helps ensure even clamping and reduces the risk of twisting or warping the stem. As always, adhere to any torque specifications. These are usually indicated on the stem or in the manual. When in doubt, tighten until snug but without using excessive force.
Step 6: Double Check and Test Ride
Lastly, give your handlebars a good shake and a tug. They should feel rock solid, indicating you’re good to go. Take a short test ride to ensure everything is secure.

Common Mistakes to Avoid When Replacing a Bike Stem
Improper Headset Preload
Getting the headset preload right is crucial for both your bike’s performance and your safety. If it’s too loose, you’ll experience unwanted play in your steering, making your bike hard to control. On the flip side, if it’s too tight, you could damage the bearings, making steering stiff and unpleasant. The goal is to achieve a headset that rotates smoothly without any play, for optimal safety and ride quality.
Incorrect Handlebar Bore Size
Size does matter, especially when it comes to matching your handlebars with your new stem. Using a handlebar with the wrong bore size can result in a poor fit and could compromise your safety. Always double-check the specifications for both your stem and your handlebars to make sure they are compatible.
( Read more: MTB Handlebar Widths: Finding the Perfect Fit for Your Bike )
Wrong Handlebar Clamping Method
As we discussed earlier, not all stems require the same clamping method. Some require even gaps, while others specifically demand no gap at the top. Using the wrong method can lead to uneven pressure on your handlebars, making them prone to slipping or even breaking. Always refer to the manufacturer’s guidelines or consult your friendly local bike mechanic if you’re unsure.

Failing to Align Handlebars Properly
An improperly aligned handlebar can mess with your bike’s steering and make your ride feel like a game of pinball. It can also result in wrist or back pain over time. Be patient and meticulous during the alignment process. Your future self and your chiropractor will thank you.
Over-tightening Bolts
The temptation to turn every bolt into an unyielding, immovable object is strong, but resist! Over-tightening bolts can lead to stripped threads and damaged components. And let’s face it, no one wants to break out the emergency toolkit five miles into a beautiful trail ride.
Conclusion
In wrapping up, never underestimate the humble bike stem—it’s like the rudder of your two-wheeled ship, small but oh-so-critical for both comfort and control. Replacing the bike stem correctly means safer, smoother rides and less cursing under your breath when you hit a bump. But don’t stop your bike love affair at the stem; a well-maintained bike is a joy forever—or at least until your next upgrade. So check that chain, tighten those brakes, and maybe even spritz a little bike-friendly cleaner. Your bike will thank you, and your future rides will be the better for it. Happy cycling!